AddThis

Share |

February 27, 2011

Anything but a face-


The minute I saw the it was "anything but the face" as this weeks challenge, I instantly thought of this picture. I LOVE this picture and always wanted to get it as a canvas for my daughters wall. It says so much about who she is... without seeing her face.


February 7, 2011

Adding Texture to a Photo Using Photoshop

Adding a texture overlay to a photo is easier than you may think and can add that little something "missing" from your photography...


In the picture above and the one I am going to add for this tutorial is Timeworn Texture Soft from Paint the Moon. Follow this link and grab your free sample!

First open the picture you want to add a texture to....

Isn't he cute?! Six months is a FUN age to work with!!

Make sure your photo is completely edited the way you want it and then create a new layer and FILE> PLACE  and find the texture you want to use. I have mine organized in it's own folder and organized by color like the OCD freak that I am :)


Drag the corners to cover the picture and click to commit :)


Now you need to change the blending mode. I like to use overlay for adding texture, but experiment and find what you like and what works best with the photo and texture that you are using.
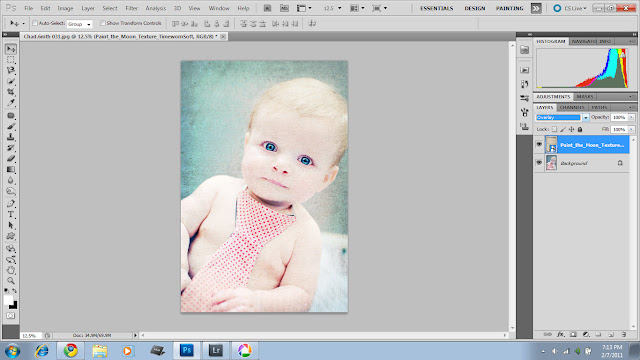
Now reduce the opacity....


To get rid of the texture that is on the skin add a layer mask to the texture layer, use a black brush and paint over the skin areas. I like to start with a low opacity brush so that it is a faded edge and not a hard edge.


Make sure you are happy with the opacity of the texture and then flatten image.

Look at the clock in the lower right corner of my pics... Time: 4 minutes!! and that's stopping to take Screen Shots, usually it only takes me 2 :)

There are TONS of free textures out there for you to try... and then if you LOVE the look of textures on your photos, there are a gazillion more textures to purchase!

E | Wedding - Fountain Hills, Arizona Photography

I had the privilege of assisting Reflections by Ivy with this beautiful destination wedding in Fountain Hills. The Copperwynd Resort proved to be a beautiful setting with gorgeous views and pristine weather for a November wedding. Thank you, Ivy for allowing me this opportunity and congratulations to this fabulous Bride and Groom!!


February 3, 2011

Testers Needed

I would love to start sharing different designs that I make such as album templates, blog template, storyboards, etc... but I have never used a media sharing site before. So I want to give this a try....

Here is a blogging template I just made. To use this as your own, download the file and open in photoshop. Above each layer with a black box, create a new layer and File>Place the photo you want to use. Resize the photo making sure to maintain the ratio. Then hover your mouse between the two lines on the layers palette (the layer with the black box and the layer with your photo) and hit the Alt key and then tap that line... this creates a clipping mask. You can move your photo around, free transform, etc. Now go to the next layer with a black box and repeat the steps above until you are done.  

So please go here and tell me how it works for you and then I can start sharing more fun stuff!!!! 

Here's the example:
FYI: the Fonts used are Adorable and Leander
Both are FREE!! and some of my favorites!!
That cute design at the bottom is a from The CoffeShop Blog


February 2, 2011

H Family | Lakeside Arizona Portrait Photography


I had the privilege to hang out with this little guy and his family on his second birthday! It was a beautiful, sunny day! There was still plenty of snow left on the ground at Woodland Lake and the ice had melted enough for the ducks to swim around under the bridge. Happy Birthday, sweet little man!!
Related Posts Plugin for WordPress, Blogger...